GPG stands for GNU Privacy Guard, it’s a public-key cryptography that can be used to digitally sign items like commits in Git. GPG provides a lot more functionality, but let's go into why you would want to digitally sign your Git commits. Git does not have any way to validate the author of a commit. When setting up a Git client on your system you are able to use any email address you desire. Even Github has no way of knowing who made a commit, usernames are only used for permissions to the repositories and functionality on the web interface. If you are able to access a repository, you can change your local Git settings to make a commit as someone else. You can see this with a commit linked on Hacker News where it looks like Linus Torvalds made a commit into someone’s repository.
So, how do you prevent this? Github lets you setup GPG signature verification which will put a nice verified signature on your commits. This will show everybody that this commit in fact came from you.

Github has a great number of articles/posting about setting GPG signature verification, so to not just rehash the great work Github has done, I will provide the copy and paste cliff notes version to quickly get you setup using macOS Sierra.
We are going to be using Homebrew to install GPG. Homebrew is a really great tool that you should have installed if you're doing any substantial amount of work on macOS. Let's update Homebrew and install GPG,
1 2 | |
Now that GPG is installed, let's make a key. I like to make my keys 4096 bits long but that is not the default option. To be able to make a 4096 bits key you will need to use the --full-generate-key flag on the gpg command.
1 2 3 4 5 6 7 8 9 10 11 12 13 14 15 16 17 18 19 20 21 22 23 24 25 26 27 28 29 30 31 32 33 | |
The default option for the life of a key is forever, your key will not expire. However, if you are creating a key on a company system, setting an expiration time may not be a bad idea, because you may not always have access to the system. As you are doing this, it will ask for a secure passphrase. This is something you want to put some thought into. It is the last bit of protection for your key file if anyone gets hold of it, but it is also something you will need to type in quite often when you perform a commit.
Now it’s time to export the key, you first need to get the GPG key ID.
1 2 3 4 5 6 7 | |
In this case, the ID is 5E81E8DCF8D916C64E2CAE76547B63AD1A566575. Now to export the public key,
1 | |
This will show you the public key block. It is safe to share and what you need to copy and paste into the Github web interface. If you want to quickly copy the output from the command line, there is a macOS utility called pbcopy. This will let you pipe an output of a command into your clipboard if you add | pbcopy you should have it copied and ready to be pasted into the text box on Github.
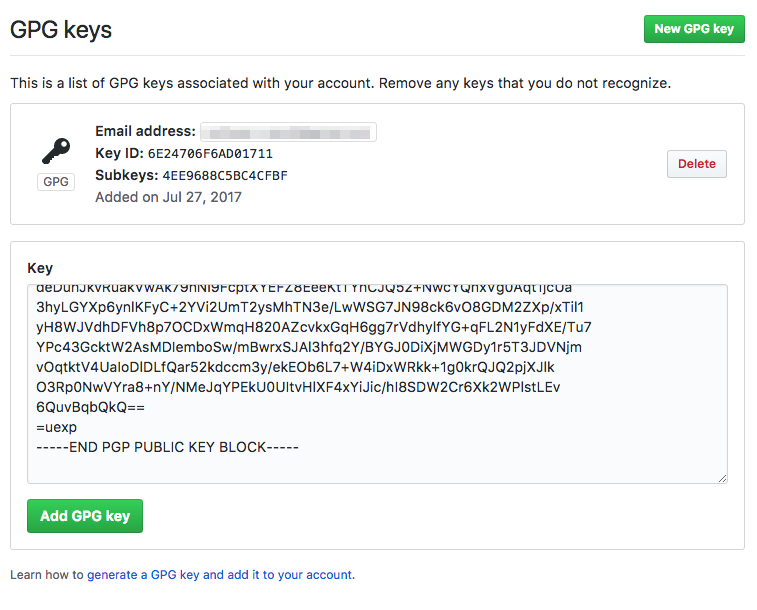
Click the “New GPG key” and paste the key into the text box and click “Add GPG Key”. As you see from the screenshot, you can have more than one GPG key setup on Github, similar to SSH keys.
Now let’s make sure you use it when you make a commit! By default, Git will not use your new GPG key, you need to set it up. Using the same GPG key ID as before, in this case, 5E81E8DCF8D916C64E2CAE76547B63AD1A566575, you can use these two commands to ensure that every commit you make gets signed with your GPG key.
1 2 | |
If you wish to have more fine-grained control over when you use your GPG key, then don’t run the second command and commit using the -S flag like so git commit -S. For myself, I find it easier to just set commit.gpgsign to true and forget about it. If you need to change the settings later on, you can find them in .gitconfig in your users home folder.
One last thing you need to do to get everything working, you need to export a GPG_TTY environment variable like so,
1 | |
If you forget this step you will get errors from a Git commit, for example error: gpg failed to sign the data
So, in about 8 commands you can start signing your commits and letting people know that they are in fact from you by letting Github show they are verified. Not too bad, and yes it’s maybe annoying to enter your passphrase to be able to commit, but I think for the security that you get it's worth the additional effort.
Since you're already being all fancy and secure, why not make sure you also have two-factor authentication set up on your Github account. It’s quick and easy and you should do it to ensure that all your code is safe and sound!